How To Install Staybull™ Flooring
Read all instructions before starting your project.
Inspect Each Plank
Wood is a natural product containing natural variations in color, tone and grain. Color variation between planks is to be expected in natural wood flooring. Remove flooring from cardboard boxes and allow flooring to acclimate for a minimum of 7 days in the same area where flooring is to be installed. Use a moisture meter to ensure that wood flooring is properly acclimated to an average 6–8% moisture prior to installation. A dehumidifier placed in the room may aid in achieving these levels.
We urge you to inspect for color, finish and grain before installation. Care should be taken during the installation process to cut out characteristics that you do not desire. We suggest you use cut planks as pieces to begin each new row and to “rack” the flooring, staggering joints at a minimum of 6 inches apart to ensure a random appearance.
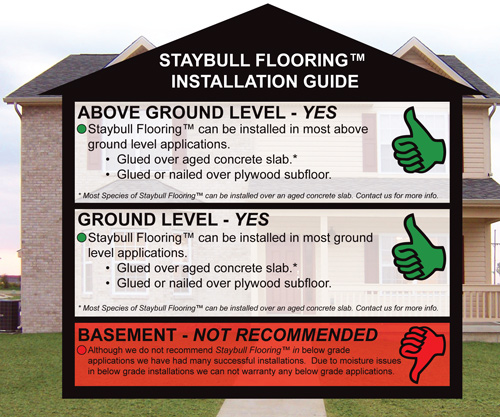
Sub-Floor Preparation
- Remove any existing floor coverings. Do not apply Staybull™ Flooring over existing floor coverings.
- Make sure subfloor is clean and free of any dust, oil, dirt, grease, wax, sealers, paint, adhesives or any other substance that would hinder adhesion. (See figure b.)
- Make sure subfloor is dry. Using an approved moisture meter, measure the moisture content in the subfloor. For a plywood subfloor it should be between 6% and 10%.
-
Make sure subfloor is structurally sound.
- Concrete should be smooth, crack free, at least 6 months old, and fully cured as to not add moisture to the flooring.
- Planks may be nailed to a single layer of 3/4″ thick tongue and grooved plywood. Plywood should be securely glued and nailed to floor joists on 16″ centers.
If the underlying substrate plywood is less than 3/4” thick or is a wood product other than plywood, add a second cross layer for strength and stability not less than 5/16″ thick. To prevent squeaking, use ring shank nails, coated nails or coated staples every 6″ to secure the second layer. Glue (construction adhesive) and screw down plywood, when installing any added layers of plywood to the subfloor.
Wood product subflooring should be covered with a layer of felt roofing paper or Red Rosin Paper prior to nailing flooring down.
Structurally sound wood floors should not have movement or deflections. Subfloor movement or improper subfloor installation may eventually cause squeaking.
High moisture content of subflooring or concrete slabs may cause cupping, twisting, and other problems in the finished hardwood flooring. Excessive moisture of the subfloor is the leading cause of any wood flooring problems, so be sure to only install wood flooring over adequately dried subflooring and well cured slabs. A dehumidifier used for several days in the installation area prior to bringing flooring in to acclimate will help to remove excess moisture. Ensure that any basement or crawl space under flooring area is adequately dry as not to add moisture issues to the flooring area.
Blending of Cartons
To get a more uniform appearance across the complete floor, it is advised to open several cartons of flooring and stack the planks in the work area so the flooring is blended during installation.
Please note: Staybull Flooring manufacturers, agents, reps, distributors, retailers, and other related parties accept no responsibility for costs incurred when a floor with visible defects has been permanently installed or when installation instructions are not properly followed. Defects should be culled from flooring prior to installation.
Please keep in mind that it is always a good idea to retain a few planks in case a repair is ever required.
Preparing Doorways and Skirting
- Remove existing base molding, quarter round and doorway thresholds. Save to reinstall later to cover any unattractive edges.
- Undercut all door casings 3mm (approx. 1/8″) higher than the thickness of the flooring to be installed. Put a scrap piece of plank on the substrate as a guide and cut the door casing with a handsaw or power undercut saw set to the correct height.